显示标签为“completely”的博文。显示所有博文

2014年6月18日星期三

How to Remove iTunes On Windows Computer?

My cousin uninstalled iTunes 10 when it came up a couple of days ago for windows 7 and tried to install iTunes 10.5 and it won’t work. He deleted all existing apple programs from his computer but when he tries to install again it says long error involved with Microsoft? Currently, he can apparently no longer connect to the iTunes Store, either through the computer or through the iPod.
In such instances, it may be necessary to remove all traces of iTunes, QuickTime, and related software components from your computer before reinstalling iTunes. You can get that done by following the steps in this article.
Use the Control Panel to uninstall iTunes and related software components in the following order and then restart your computer:
  1. iTunes
  2. QuickTime
  3. Apple Software Update
  4. Apple Mobile Device Support
  5. Bonjour
  6. Apple Application Support (iTunes 9 or later)
Here are the more detailed steps on removing these components:
  1. Quit the following programs if they are running:
  2. iTunes
  3. QuickTime Player
  4. Apple Software Update
  5. From the Start menu, click Control Panel.
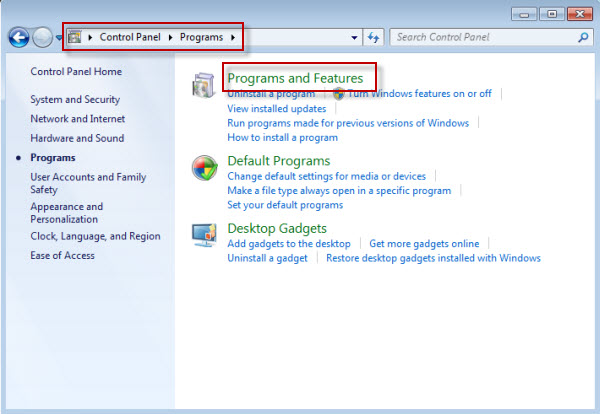
  6. In Control Panel, click the “Uninstall a program” link as shown below. The Programs and Features Control Panel opens.

  7. Alternately, if you do not see the “Uninstall a program” link, click Programs and Features.
  8. Select iTunes from the list of currently installed programs. Then, click Uninstall.
  9. When asked if you would like to remove iTunes, click “Yes”.
  10. After the uninstall process is complete, do not restart your computer if you are prompted to.
  11. If you see other iTunes entries in the list, remove them as well by repeating steps 4-6.
  12. Restart your computer.
Normally, removing iTunes and its related components from the Control Panel will remove all supporting files belonging to those programs. In some rare cases those though, files may be left behind. Therefore, you should confirm that the following files and folders have been removed after following the previous steps. If any are left behind, remove them now:
  1. C:\Program Files\Bonjour
  2. C:\Program Files\Common Files\Apple\
  3. C:\Program Files\iTunes\
  4. C:\Program Files\iPod\
  5. C:\Program Files\QuickTime\
  6. C:\Windows\System32\QuickTime
  7. C:\Windows\System32\QuickTimeVR
Uninstalling these components in a different order, or only uninstalling some of these components may have unintended affects when installing iTunes 10.5. It is highly recommended that you should deploy an effective program remover to get rid of iTunes 10.5 with auto means. Such program is a Perfect Uninstaller that is specifically designed for uninstalling iTunes of all components with only a few clicks!
Uninstall iTunes 10.5 with Perfect Uninstaller
  1. Free download and install Perfect Uninstaller.

  2. Click each component of the iTunes 10.5 in the “Display Name” list.
  3. Click the “Uninstall” button to start the removal.

2014年6月17日星期二

How to Uninstall Speedbit Video Accelerator in Windows 7

You can’t uninstall Speedbit VideoAccelerator since the error messages frequently pop up and corrupt your PC? Are you confused that you can’t get rid of it through “Add or Remove Programs”? Speedbit Video Accelerator is an useful tool for you to manage your email. Unfortunately, you have to uninstall it due to it is unavailable. And you might not want to continue to use it any more. So you decide to use another program to instead of Speedbit Video Accelerator. However, I can’t delete the software because you can not fully uninstall and remove Speedbit Video Accelerator. You might have no idea about the Speedbit Video Accelerator removal. In fact, it is the most important for you to make sure that you have already deleted all related extensions and other leftover files in your computer. And you know the effective removal instructions in this article below.


Obviously, you would like to use free common method to uninstall Speedbit Video Accelerator. And you will use Windows uninstaller in Control Panel. You can follow these steps as following. Click “Start” > “Control Panel” > Add or Remove Programs” > Select the file of Speedbit Video Accelerator and Click “Remove” button. However, it is still difficult to completely remove its components due to they are stored with your Windows system well. Even though you have to reboot your PC to repeat these steps again and again, Speedbit Video Accelerator has not been fully removed. If you are a computer expert, you could access Registry Editor to delete all related files by manual. And you might feel so tired about these processes.


In fact, there is another choice for you to get rid of Speedbit Video Accelerator from your computer. Perfect Uninstaller will automatically and completely scan and remove all files and extensions which are related to Speedbit Video Accelerator. And what you need to do is just click “Uninstall” button. And the program will be removed with ease.

2014年6月16日星期一

How to Uninstall AntiMalware Pro Entirely

Do you want to uninstall AntiMalware Pro? AntiMalware Pro is a multimedia technology developed by Apple Inc., capable of playing Internet video, HD movie trailers, and personal media in a wide range of file formats. It is compatible with Mac OS classic (System 7 onwards), Mac OS X and Microsoft Windows operating systems. If you are encountering the situations below, you may have to uninstall AntiMalware Pro:
  • You cannot keep AntiMalware Pro up- to- date.
  • When you run AntiMalware Pro, obscure error messages appear.
  • AntiMalware Pro cannot run with your instant operating system.
  • AntiMalware Pro cannot play video smoothly because it has to exploit a lot of system resources to run.
How to uninstall AntiMalware Pro manually?
If you need, you can try to uninstall AntiMalware Pro manually with the following steps below:

  1. Click Start menu, and then run Control Panel.
  2. Select the Add or Remove Programs option.
  3. In the Currently installed programs list, click AntiMalware Pro option.
  4. Select AntiMalware Pro in the Add/Remove program list, and then click the Remove button to manually uninstall AntiMalware Pro.
Note! We cannot absolutely ensure you to entirely uninstall AntiMalware Pro because the integrated and sluggish Windows Add/ Remove utility cannot help you wipe out the associated files and registry keys of AntiMalware Pro. If you have to uninstall AntiMalware Pro as soon as possible, we sincerely suggest you try the AntiMalware Pro uninstaller.
The benefits of reliable AntiMalware Pro uninstaller:
  1. Entirely uninstall AntiMalware Pro, any other unwanted software, add-on, plug- in, malicious application and unused or non- removal programs.
  2. Totally remove any associated files, empty registry keys, obsolete registry files, invalid file extensions and invalid uninstall entries.
  3. Easily locate the software and learn the information of the software with a highly easy- to- manage interface.
  4. Effectively uninstall non- removal antispyware programs and corrupted antispyware programs, such as A-squared, Norton Antivirus Program, AVG, Kaspersky, Avast Antivirus Programs, McAfee Antivirus Program, Avira Antivirus Program, Eset Antivirus Program, BitDefender Antivirus Program and TrendMicro.
How to uninstall AntiMalware Pro easily and effectively?

You can follow the steps to easily get help from a AntiMalware Pro uninstaller on your computer:
1. Free download Perfect Uninstaller here.
2. Double click to finish the installation.
3. Highlight “AntiMalware Pro” in a “Display Name” list and then select “Uninstall” to finish the uninstall process.
4. Follow the instructions on the screen to completely uninstall AntiMalware Pro.

How to Uninstall Sys Cleaner Pro Completely

What is Sys Cleaner Pro?
Sys Cleaner Pro is rogue program, which recently infects millions of computers. Like many other fake antivirus programs, Sys Cleaner Pro can not provide any protection to your computer. All it what to do is convince you that your PC need it to remove various computer threats. In fact, all you should do is to remove Sys Cleaner Pro as soon as possible.
Why I have to uninstall Sys Cleaner Pro?
Sys Cleaner Pro is quite powerful and many security programs can not remove it completely. The rogue program constantly opens a backdoor to virus and Trojan and renders your system at risk. If your security fail to remove the rogue program, you should try to uninstall it completely.
How to uninstall Sys Cleaner Pro manually?
1) Find the “start” button on the lower left corner of your monitor, and then click it.
2) Find and double click the button “Control Panel”.
3) Find “Add / Remove Program” icon in the control panel, and then double click it.
4) Find the Sys Cleaner Pro icon in the list, and then select it to start uninstalling it from your computer.
Don’t be too happy when you finished all these four steps, because for some reasons, Sys Cleaner Pro will be failed to be uninstalled because some reasons and this happen often. If you came up with this problem, I am afraid you have to uninstall Sys Cleaner Pro from your computer’s registry.
You are not suggested to try this method manually for it is difficult to discriminate which registry belongs to Sys Cleaner Pro, and which one not. Forgetting to delete one of Sys Cleaner Pro’s registries will remain Sys Cleaner Pro in your computer. The worse situation is that when you mis-delete even if one registry which not belong to Sys Cleaner Pro, but it is crucial for the system, you will mess up your computer. That will be a nightmare, right?
A professional uninstall software can save your time and prevent you from messing up your PC. It will dig into the system to find out Sys Cleaner Pro’s corresponding registry one by one, and then delete them together and completely. Sys Cleaner Pro will be removed from your computer completely through this method. Compared with so much searching work, you just need to click your mouse several times to uninstall Sys Cleaner Pro from your PC by using Perfect Uninstaller.
Now move your mouse here, take the first click to free download Perfect Uninstaller to your computer. And Sys Cleaner Pro will be disappeared completely from your computer after several minutes.

2014年6月15日星期日

The Free Way for You to Completely Remove Indesign Cae cs5

Have you tried to uninstall Indesign Cae cs5 by using “Add or Remove Programs” in Control Panel? But the problem was still there. It is so annoying that you can not remove Indesign Cae cs5 from your computer when the error message pops-up frequently. You might have no idea that you have deleted Indesign Cae cs5, but there were some leftover files or extensions in your PC. It is high cost for you to ask the computer expert for help. Thus, you need to the free uninstall tips to fully remove Indesign Cae cs5 from your computer.

Free removal tips for you to get rid of Indesign Cae cs5 completely.
As you known, you can try to delete programs in the standard way which means that you can uninstall software by using Windows uninstaller. In fact, this is a manual removal method to delete programs. At the beginning, you can have a try to find the “Uninstall” option in All Programs list. Most of case, you can’t find it successfully. So next, you should go to Control Panel to locate the “Add or Remove Programs” applet. Click “Add or Remove Programs” to select Indesign Cae cs5 in the programs list. Click “Change or Remove” button beside the software. And you will see a popup screen. Just follow the procedures and the program will get away. And now here are the most important steps. You have to delete Indesign Cae cs5 related registry entries. You should follow every steps of the uninstall tips very careful. Click “Start Menu” > select “Run” > Type “Regedit” in the dialog box > Click “YES” to access Registry Editor > Click the folder HKEY_CURRENT_USER and HKEY_LOCAL_MACHINE > Search and select the related registry entries to delete them. And you will get a prompt telling you to restart your PC. After that, you will see the Indesign Cae cs5 has been uninstalled from your computer.
Warnning: If you want to avoid your computer breaking, it is better for you to use another way to get rid of Indesign Cae cs5. The program uninstall help is free, but it is also risky. Therefore, using program removal tool such as Perfect Uninstaller is your best choice. Its powerful utility called “Force Uninstall” can help you solve all software removal problems.

how to completely remove PC speed up from windows system (Uninstall Guides)

Do you have any idea to fully remove PCSpeed Up due to it is expired?
Are you disappointed that you could not totally delete PC Speed Up as there are error message pop-up?
Are you tired to try the removal tips about how to completely get rid of PC Speed Up but you failed?
In fact, it is not difficult for you to uninstall it from your pc if you could carefully follow the uninstall guides in this article as following. At the beginning, you should know:Why you need to fully uninstall PC Speed Up from your laptop?
PC Speed Up may appear to be legitimate and have a convincing name, but it can not speed up your computer or remove malware to protect your computer. It uses the fake warning messages to frighten PC users and convince average computer users that they need to purchase its full version. PC Speed Up is similar to other rogue anti-spyware programs popping up on the Web. After you bought it, and you would find it is useless and you could not delete it with its own uninstaller. In this case, what can you do?How to entirely remove PC Speed Up from your pc without any troubles?
First of all, you need to check the system tray at the lower left end of your desktop to see if the PC Speed Up icon is present. Right click on the icon if it is showing up in the system tray, and then choose the "Exit" option from the menu that will pop up.
Hold down the "Ctrl," "Alt" and "Delete" keys at the same time to bring up the computer's Task Manager Menu.
Navigate over to the "Processes" tab and scroll down through the list of files you computer is currently using. Check to see if there are any instances of the "PC Speed Up.exe" file in the list. Click on the PC Speed Up entry if there is one and click on the "End Process" button to shut down the process.
To remove PC Speed Up that is installed under Windows XP, you need to follow the step-by-step guides below.
Click the Start button, and then you should click Control Panel menu item, and next you need to double-click Add or Remove Programs icon.
In the Currently installed programs list, select the PC Speed Up program, and then click “Change/Remove” button.
If you are prompted to confirm the removal, click “Yes”.
How to delete the program in Windows Vista, Windows 7?
Go and Click the Start button, locate the Control Panel, next, you should click Uninstall a Program under Programs, and then click Programs and Features.
Highlight PC Speed Up program, and then click “Uninstall” button.
If you are prompted for an administrator password or confirmation, type the password or provide confirmation.
However, there are many chances that subscription ran out, it says the software has been uninstalled but the PC Speed Up is still there. If this what you have run into, you need to apply a powerful uninstaller( like Perfect Uninstaller) that not only detects programs listed on startup but also removes any wanted programs from your computer with ease.

2014年6月12日星期四

how to remove VDownloader from Your Laptop?

Do you want to  uninstall VDownloader 4.0 and go back to version 3.4.5? Are you getting in trouble when you try to delete VDownloader from your computer? It is frustrated that you can not remove it as the message telling that the program is running. You are unable to get rid of it. In order to make your pc work more comfortably, you should learn the uninstall guides as following.
Do you like to  watch your Favorite Videos from, Vimeo, Metacafe, Google Video, DailyMotion, Yahoo! Video or any other major video sharing website whenever and wherever you please? With VDownloader, you’ll be able to play video or audio on the road or on vacation on your MP3, mobile device or laptop; watch videos without annoying advertisements, captions or other distractions; make backups of online videos in any possible format; they might be lost or removed!
Once the VDownloader is useless, you need to delete it. And you can follow the standard uninstall tips below.
You need to restart your computer first.
Press F8 button while you are in the process of starting.
Select Safe Mode and press Enter.
When you are in the Safe Mode, click Start and then “Run”.
Type appwiz.cpl and click OK.
Find out VDownloader and click Uninstall.
Follow the instructions till you are prompted to reboot the PC.
Apart from that, you can just make the VDownloader gone the way it comes.
Go to Google.com and Search for VDownloader.
Download VDownloader installer program to your computer.
Launch the installer program which will automatically detect the already installed VDownloader on your computer.
Out of the three options presented, select “Uninstall” or “Remove Completely” option.
Finish the wizard and restart your computer.
The last option when you can not completely uninstall VDownloader is to force uninstall corrupted or left over programs files and registry information of it. Rather than taking the risk of manual removal, Perfect Uninstaller is available and sophisticated in forcibly removing any corrupted, half-installed, half-uninstalled and hidden program like eBuddy that Control Panel can’t detect or get around.
After installing Perfect Uninstaller, run it and find VDownloader in the program list in the main interface.
Click Uninstall to proceed to start the removal processes.
Perfect Uninstaller is scanning all related VDownloader entries on your computer.
Click “Next” to remove all associated VDownloader entries and then uninstall VDownloader from your computer.

2014年6月10日星期二

COMPUTER Cleaner Uninstall Guides – How Can I Fully Remove COMPUTER Cleaner from Windows system

Do you want to totally uninstall COMPUTER Cleaner since it is corrupted? You might find that it is easy to install COMPUTER Cleaner in your computer. But, you might try to update it, and you cannot get success. It frequently pops-up error message telling you it is running. You can’t stop it unless you can fully remove COMPUTER Cleaner from your laptop and then re-install it. Unfortunately, you might not find a good way to fully delete COMPUTER Cleaner on the internet. You might have tried to delete it with their removal tips on the forum, but it failed.

Don’t worry! You could find and learn the most effective way for you to fully remove COMPUTER Cleaner from your COMPUTER.


1.       What can you do if you don’t want to use it?
If you still installed Adobe Photoshop in your computer, you need to remove them separately.
On Windows XP:
Click Start menu > Control Panel > “Add or Remove Programs” > Select COMPUTER Cleaner > Click “Change or Remove” option on the right. > in the onscreen , click Next, finally click “Remove” to delete the program.


On Windows Vista or Windows 7:
Click Start menu > Control Panel > “Programs and Features” > Select COMPUTER Cleaner > Click “Uninstall” option on the right. > In the onscreen, click Next, finally click “Remove” to delete program.
2.       How to remove COMPUTER Cleaner if it is broken and it is not listed in the programs list?
Obviously, when COMPUTER Cleaner is corrupted, the removal ways above are not good enough. You could not just follow the normal way to delete COMPUTER Cleaner. There is one more step to help you get rid of it. You need to go into the registry editor to remove COMPUTER Cleaner related files in the registry. However, it is very dangerous for you to follow the detailed procedures. Any mistakes happen will destroy your system. Thus, it is not recommended to manually delete COMPUTER Cleaner.
 If you wish to uninstall COMPUTER Cleaner but keep getting an error messages with the Add/Remove method that says the installation has been corrupted. You cannot remove it successfully. The best way should be using specified uninstaller tool like Perfect Uninstaller. You will be able to locate all the components of COMPUTER Cleaner by using PerfectUninstaller. Accordingly, you can click on each related program and press on the uninstall option to clean them up with ease.
Can't remove COMPUTER Cleaner?  It is guaranteed by Perfect Uninstaller!

2014年6月9日星期一

Completely Uninstall Cocoon the Best Effective Cocoon Removal Guides

You might just install Cocoon and then want to delete it because it is not good enough. But it is complex to uninstall Cocoon from your PC.  Cocoon is an all-in-one plug-in that makes everything you do online private, secure and virus-free. Without Cocoon, websites have access to your computer to leave cookies or infect it with viruses and malware. Cocoon even makes open WiFi access points secure. Features: Truly anonymous browsing; Anti-virus protection; Cookies stored off your computer; Secure connection on public wifi; Privacy on shared computers; Encrypted browsing history; Anonymous email creation; Blocks drive-by malware attacks; History access on multiple devices; Secure webmail access. Free account must be created and activated at the getcocoon.com/signup to use the Cocoon service.
But, to all the users who are running Firefox, it is not that well-expected program for them and some of them just want it gone.
Run Windows Explorer.
Locate the Program Files and double click to open it.
Navigate to Mozilla Firefox to open it. (Default path of Firefox should be C:\Program Files\Mozilla Firefox\)
Open the Components folder and find the file labeled Cocoon.xpt.
Right click on the file and select Delete.
In the Plug-in folder, right click on the file labeled Cocoon.dll and select Delete.
Restart the Firefox.
Apart from that, there are still some parts of Cocoon built into the registry keys.
Open the Windows Task Manager by pressing Ctrl + Alt + Delete on the keyboard.
End all processes related to Cocoon.
Go to Start Menu and then click on Run.
Enter “regedit” to activate the Registry Editor, and scroll down all folders to find and delete every related key, such as:
HKEY_CURRENT_USER\Software\Cocoon
HKEY_LOCAL_MACHINE\Software\Cocoon
As you may be aware that manual deletion of the files and registry keys may be a difficult task, In this case, it requires you to be cautious when conducting manual deletion. There is the other way that helps you fully get rid of Cocoon. Perfect Uninstaller is a fantastic removal tool that can help you fully remove and uninstall Cocoon with great success with a few clicks. Not only will this program remove add-ons programs and allow you to delete left over etc, but it also has the added benefit of being able to access delete all the left and useless registry entries and values, as well as all related traces with a few clicks. Other than that, it can also completely remove other programs like Norton.